Onderwerp: Stap voor stap foto's van taarten.
Hoi hoi,
Het leek me fijn om een stap voor stap onderwerp te beginnen waar allemaal stap voor stap foto's geplaatst worden van taarten en alles eromheen.
Een beeld zegt immers zov
Je bent niet ingelogd. Inloggen of registreren.
DeLeuksteTaarten.nl Forum » Taartdecoratie algemeen » Stap voor stap foto's van taarten.
Pagina's 1
Log eerst in inloggen or registreren om te reageren
Hoi hoi,
Het leek me fijn om een stap voor stap onderwerp te beginnen waar allemaal stap voor stap foto's geplaatst worden van taarten en alles eromheen.
Een beeld zegt immers zov
Garneer cornetje:


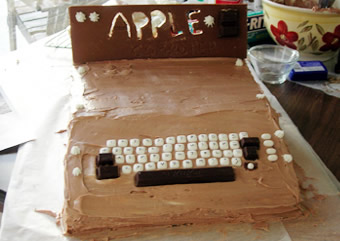
Building the Apple geek's dream cake.
First off, assemble all the supplies needed:
1 large Lindt Swiss Classic chocolate bar
An awl.
Baking supplies such as flour, baking powder, salt, sugar, oil, eggs, milk, vanilla or cocoa, at least one 9x12" baking pan, mixing bowls, spatula, wooden spoons, hand mixer, oven mitts, large knife.
2 cans of vanilla icing and 1 can of chocolate icing.
1 tube white decorating icing with icing tip attachments.
Icing knife, (other utensils can be used in a pinch.)
1 Dark chocolate KitKat bar.
1 Cadbury Burnt Almond chocolate bar.
1 package Dentyne Mints.
1 fine tipped permanent marker.
Pack of TicTacs
1 pack Wrigley's gum.
30 birthday candles.
matches.
wax paper, plastic wrap.
Step #1, The Carved BackBoard
Perhaps the most challenging aspect of this cake was re-creating the crafty wooden backboard with the words "Apple Computer" carved into it. We love a culinary challenge, so we decide to make this part of the cake first. That way, if it proved impossible, we could always just cook up a few iPod cupcakes. :-D
For the backboard's structure, we used a large Lindt Swiss Classic chocolate bar. It was the right size and proportion, and also thick enough to withstand the carving process. Snaggy carved the "Apple" letters out of the chocolate using a "hot knives" method... an awl was heated on a stove element, then carefully and gently pushed though the back of the chocolate bar.
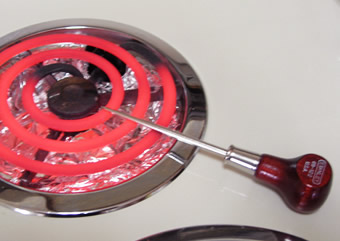
This takes time and patience, and you'll have to wipe off the awl repeatedly and reheat it a number of times, but it does the job nicely. To make things easier, you may want to lightly scratch the pattern of the words in the bar before you start awling.
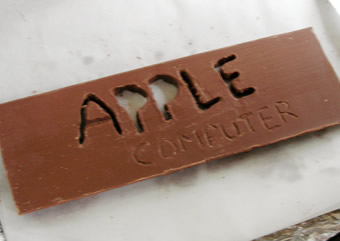
The word "computer" doesn't have to be melted all the way through, it can be gently carved with a knife. It might be a good idea to buy a second chocolate bar as a back-up in case something goes wrong with the first one, especially if you like chocolate. :-)
For the electrical outlets that are mounted on the backboard, we used two squares of a Cadbury Burnt Almond bar. To attach it to the Lindt chocolate, we gently melted the back of the Burnt Almond squares with a heated spoon, and fused it to the milk chocolate piece. Getting hungry yet??
Step #3: Baking!
The Smithsonian Apple I is a fairly large object. Although our cake isn't exactly to scale, we still needed a LOT of cake volume to create it.
We baked four, 9"x12" cakes. Nitrozac used the "White Cupcake" recipe from Robin Hood. You can use your favorite cake recipe, or one of those pre-made mixes from the grocery store, it's up to you. If you are going for authenticity, we recommend you not bake a chocolate cake. Why? We'll let you in on a little-known Apple creator tidbit.... Woz does not like chocolate cake.
Try to bake these cakes several hours before icing, in order to allow them to cool completely. If you ice a cake too soon, while it's still warm, the icing will melt and the cake will become a hideous blob of unappetizing goo. Not good.

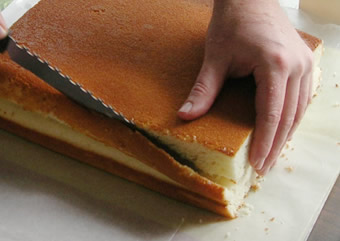
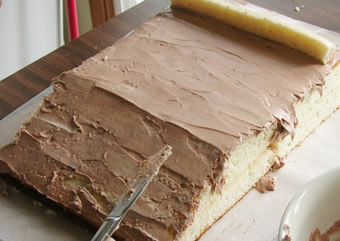
Step #4: Cake modding!
Prepare your work surface. We used a piece of wooden board so that we could move it around for decorating ease, (it also mimics the Smithsonian display's desk), putting wax paper on top of the board, which we later trimmed away.
Stack two of the cakes on top of each other with the bottom up on the top cake. Carefully trim off the sides to make the edges of the cake flush. If you like, you can put icing in between the cake layers. Although it looks more impressive in the final slices, we opted to not ice between the cake, so as to insure we had enough icing for the outside, and to save a few calories.
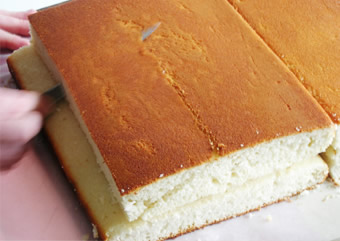
Place the other two cakes next to the first two, and trim those edges. Again the bottom of the top cake should be facing up. Save a couple of these cake strips, as you'll be needing them to help you attach the chocolate bar backboard later.
Angle off the top cake at the appropriate angle for the Apple I's slanting face, where the keys will sit.
Step #5: The Icing on the Cake!
In a bowl, combine the vanilla icing with a few tablespoons of chocolate icing, and gently mix them together with a large spoon. You are aiming for a slight woodgrain effect, not a perfectly blended color. Once you think you have a nice blend, blob on the icing and spread it around as evenly as you can, go with a side to side motion to emulate the wood paneling. Try not to work it too much, especially over areas that have been sliced, or you'll get crumbs in the icing. Ice the back and sides of the cake too.
Step #6: Decorating the cake!
We were wondering what could we use for the keyboard keys? We had thought about using sugar cubes, but they proved too large for the scale of our project. During a shopping spree to get more baking products, I scanned the candy bar racks for inspiration. There I spied what I needed... Dentyne Ice Mints!

Het bekleden van een taart met fondant


Een heel leuk idee.... wat inderdaad al de bedoeling was, zie het topic in "Over de site"  Er komt een FAQ en de Howto's worden gesplitst in "Technieken" en "Projecten".
Dit topic kan daarbij prima als inspiratiebron dienen, maar hou er wel rekening mee dat als je linkt naar plaatjes van een site, de eigenaren van díe site voor het dataverkeer betalen. En een verwijzing naar de orginele site als je tekst gebruikt, is wel zo eerlijk.
Een heel leuk idee.... wat inderdaad al de bedoeling was, zie het topic in "Over de site"
Dit topic kan daarbij prima als inspiratiebron dienen, maar hou er wel rekening mee dat als je linkt naar plaatjes van een site, de eigenaren van díe site voor het dataverkeer betalen. En een verwijzing naar de orginele site als je tekst gebruikt, is wel zo eerlijk.
Oohoow!!
Dit wist ik dus allemaal niet..:o
Zal gewoon linken plaatsen voortaan.
Bedankt voor de info!
Dit is een hele leuke:
helemaal goed zeg die van het cornetje
ik heb er nog steeds moeite mee.
Maar ik ga het toch maar weer eens proberen,
geeft iemand ook nog een workshop cornetjes maken?????
Ik vind dit stap voor stap idee wel heel leuk.
ik denk dat ik het idd van kijk en volg moet hebben
Eugenie
Oohoow!!
Dit wist ik dus allemaal niet..:oZal gewoon linken plaatsen voortaan.
Bedankt voor de info!
Links zijn sowieso heel leuk, is ook al gevraagd of ik die wilde bundelen maar ik zoek me altijd suf naar alles wat ergens is gepost... Dus ik vind dit topic echt een heel leuk idee van je!
helemaal goed zeg die van het cornetje
ik heb er nog steeds moeite mee.
Maar ik ga het toch maar weer eens proberen,
geeft iemand ook nog een workshop cornetjes maken?????Ik vind dit stap voor stap idee wel heel leuk.
ik denk dat ik het idd van kijk en volg moet hebbenEugenie
Ik had nog eens op mijn laptop ergens een hele leuke stap voor stap foto van dat cornetje.
Zal die ook even voor je opzoeken en eventueel even zoeken naar filmpjes met cornetjes.
Je ziet het wel verschijnen zodra ik ze vind allemaal..;)
Rosa schreef:Oohoow!!
Dit wist ik dus allemaal niet..:oZal gewoon linken plaatsen voortaan.
Bedankt voor de info!Links zijn sowieso heel leuk, is ook al gevraagd of ik die wilde bundelen maar ik zoek me altijd suf naar alles wat ergens is gepost... Dus ik vind dit topic echt een heel leuk idee van je!
Heel erg bedankt Marianne!
Ik wil je wel helpen met het zoeken van links die al geplaatst zijn en die samen bundelen.
Ik zal mijn laptop
helemaal goed zeg die van het cornetje
ik heb er nog steeds moeite mee.
Maar ik ga het toch maar weer eens proberen,
geeft iemand ook nog een workshop cornetjes maken?????Ik vind dit stap voor stap idee wel heel leuk.
ik denk dat ik het idd van kijk en volg moet hebbenEugenie
Bingo!
Kijk eens:
Rosa ontzettend bedankt he
Nu van de week lekker oefenen.
Pagina's 1
Log eerst in inloggen or registreren om te reageren
DeLeuksteTaarten.nl Forum » Taartdecoratie algemeen » Stap voor stap foto's van taarten.
Powered by PunBB, supported by Informer Technologies, Inc.